Network Access = A - B = 타 개체에 접근 커플링 = Key IKE(Internet Key Exchange) = 전 세계 우리둘만 아는 걸 맹글자~라는 개념입니다.
1. PSK(Preshared-Key) = 접속 전에 미리 공유한 대칭 키 = WiFi에서 암호화 및 무결성 한번쯤 보셨을 꺼에요 A --- B 1234 1234 2. RSA = 비대칭 키 공개키=부호화 1234 -> $6123abc $6asdfiasjodfajsfasfj1231241824u 개인키=복호화 $6123abc -> 1234 => $6asdfiasjodfajsfasfj1231241824u =============================================================================================================== 37 번행 #LogLevel INFO 로그기록 수준을 의미하는 항목 emerg : 시스템이 다운되는 수준 crit : 유틸리티나 서브시스템을 종료해야 하는 수준 warning : 단순 경고 메시지 수준 info : 정보를 보여줘야 하는 수준 39번행 #Authentication : 인증 (ID 식별 인증 항목) 42번행 #PermitRootLogin yes : 관리자로의 로그인을 허용 할것인가에 대한 항목 기본값으로 관리자의 접근을 허용하지만 권장하진 않는다 ---------------------------------- ** ssh 보안설정 usermod -G wheel user1 find / -name su /bin/su ==> su 변경 ls -l /bin/su chown .wheel /bin/su chmod 4750 /bin/su ------------------------------------ 47번행 : RSA 인증 옵션, 프로토콜 버전1에서만 적용되는 옵션 65번행 : Password 없이 접속 여부 // 기본값 NO PAM : 착탈형 인증묘듈 = 지정된 서비스에 인증에 대한 묘듈화 지원 126번행 : 가상 root 디렉토리 지원 132번행 : sshd 데몬을 통하여 다른 프로그램 즉, sftp-server를 실행할 수 있도록 설정하는 항목 ========================================================== ** SSH 서비스 접속 sftp 라는 건 SSH 를 설치 하게 되면 자동으로 sftp 를 쓸수 있게 된다 그냥 ssh로 ftp를 사용 = 보안화된 ftp정도로 생각하면 됨. sftp 192.168.1.10 : ssh 서비스 접속 ssh 192.168.1.10 : 로그인 한 계정으로 접속 시도 ssh user1@서버IP : 지정한 계정으로 접속시도 sftp user1@서버IP : /home ==> home 디렉토리로 접속 ========================================================== 원격지의 데이터 복사하기 : scp(secure Copy) ssh 서비스가 구성되어 있는 System을 대상으로 원격 복사 할 수 있는 프로그램이며 openssh-clients" 패키지에 포함 되어 있다
#scp [Option] [원본파일 위치] [Server-IP] => 접속한 계정으로 보안복사 시도 #scp [Option] [원본파일 위치] [계정명]@[Server-IP] => 지정한 계정명으로 보안 복사 시도 ====================================================================================== 문제~) 192.168.1.10 = Server IP 192.168.1.20 = Client IP
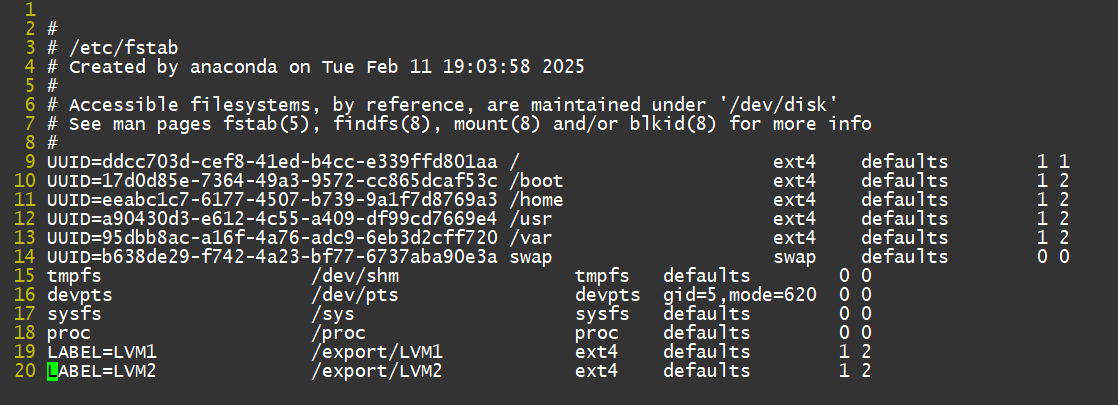
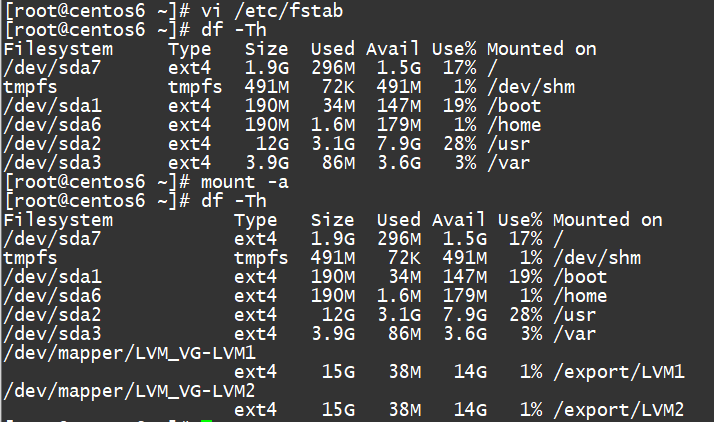
5. vi /etc/fstab 들어가서 자동 마운트까지 진행 /dev/sdb2 /ssh/sdb ext4 defaults 1 2 <= 이렇게 입력하고 나와서 mount -a 까지 (오타 검증)
6. cd /ssh/sdb 들어가서 7.mkdir scp sftp ssh && touch scp/chw sftp/user1 ssh/iu 디렉토리와 각각 하위에 있는 파일들까지 생성
8. vi /etc/ssh/sshd_config 가서 42번줄에 root의 로그인은 불가
9. ls -l /bin/su 해서 SetUID 셋팅 => iu 라는 계정만 su 명령어 이용 가능 (wheel 그룹에 iu 계정을 추가해 주세요)
클라이언트 설정 1. mkdir /client 2. cd /client 3.mkdir scp sftp ssh && touch scp/chw_lucky sftp/user1_lucky ssh/iu_lucky
서버의 디렉토리 및 파일 생성 현황 /ssh/sdb/scp/chw(file) /ssh/sdb/sftp/user1(file) /ssh/sdb/ssh/iu(file)
client의 디렉토리 및 파일 생성 현황 /client/sdb/scp/chw_lucky(file) /client/sdb/sftp/user1_lucky(file) /client/sdb/ssh/iu_lucky(file)
문제 푸는 방법 1. 서버 putty 종료, 모든 실행은 client putty에서 진행 2. /client 하위에 있는 디렉토리들 방법으로 업/다운을 합니다. 3. server에 있는 각 scp,sftp,ssh 디렉토리 밑에 있는 파일들을 클라이언트로 같은 이름의 디렉토리로 다운로드 4. /client 하위의 디렉토리 밑에 있는 각각의 파일 들을 서버로 같은 이름의 디렉토리로 업로드
./ssh: 합계 0 -rw-r--r--. 1 root root 0 2025-02-18 14:51 iu -rw-r--r--. 1 root root 0 2025-02-18 13:54 iu_lucky
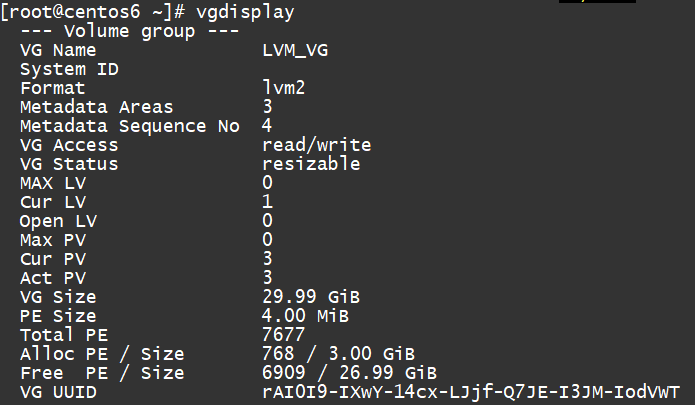
LVM
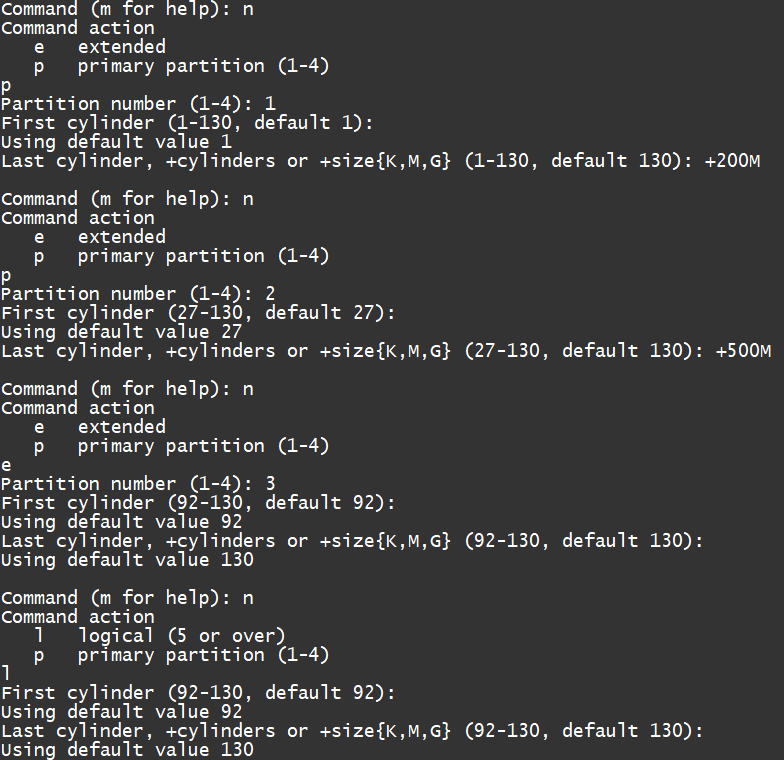
1g 3개 10g 3개 추가
RAID 생성
레이드 생성된게 확인됨 RAID(Rendundancy Array Inexpensive Disk) =물리적 다중 디스크를 모아서 논리적 단일 디스크로 만드는것 장점 : 속도 자동복구 단점 : array 축소 확장 불가능 =============================================================================================== LVM(Logical Volume Management) =물리적 다중 디스크를 모아서 하나의 볼륨 그룹으로 만든 다음 다시 논리적 볼륨으로 쪼갠다 = 뷔페 P.V V.G:LVM_VG L.V 장점 : 볼륨 축소 및 확장이 탄력적이다 => 레이드의 단점복구 단점 : 속도증가 및 자동복구 안됨
LVM 구성순서 = PV -> VG -> LV PV 물리적 볼륨 정의 VG 뭉친다 LV 다시 쪼갠다
**명령어 create 생성 remove 삭제 scan 검색 = 심플하게 보는거 display 확인 = 자세히 extend 확장 reduce 축소 change 속성변경 -a y/n 사용여부 -l 숫자 logical 볼륨수